
In the first part of this article series, I’ve described how to set up a root server which can serve KVM guests which only have IPv6 connectivity. I use the German hosting provider Hetzner as an example and describe a bridged setup which fits into that provider’s IPv6 infrastructure.

Network switch
After the basic setup, we need some more services on the host to be able to install the first guest systems.
Create a non-root user on the system.
Hetzner’s installation process generates a system with only the root user. To make it more compliant with usual Ubuntu behaviour, add a non-root user:
- Create user with
adduser. - Put your ssh public key into
.ssh/authorized_keysof that user.
You can now either perform the following steps as that user with sudo -s or continue as directly logged in root via ssh.
NAT64 with Tayga
As I wrote, our guest systems shall have IPv6-only internet. That implies that they cannot access systems which are IPv4-only. Unfortunately, even in 2018, there are quite popular sites like github.com which do not have any IPv6 connectivity at all. To make such systems accessible from the guest systems, we set up a NAT64 service which performs a network address translation for exactly this case.
I decided to go with the „Tayga” server. Its scope is limited to exactly perform NAT64. This makes it necessary to add further services to make all this really useable but it also minimizes configuration complexity. This is what I did:
- Install the tayga service by the usual
1apt install tayga
- In
/etc/tayga.conf, enable the disabledipv6-addrdirective as this is needed for working with the well-known prefix. You should set the IPv6 address to something random in your IPv6 subnet:1ipv6-addr 2a01:4f8:1:3:135d:6:4b27:5fAdditionally, switch the
prefixdirective from the activated2001...one to the64:ff9b::/96one::12# prefix 2001:db8:1:ffff::/96prefix 64:ff9b::/96 - The whole Tayga configuration reads like this:
12345678910111213141516171819# Minimum working NAT64 Tayga configuration for KVM host with IPv6-only guests# (A) Basic setup# Device name, this is the defaulttun-device nat64# Data dir for stateful NAT informationdata-dir /var/spool/tayga# (B) IPv6 setup# The „well-known” prefix for NAT64prefix 64:ff9b::/96# IPv6 address, from the official ::/64 networkipv6-addr 2a01:4f8:X:Y:14a5:69be:7e23:89# © IPv4 setup# Pool of dynamic addressesdynamic-pool 192.168.255.0/24# IPv4 address, not to be used otherwise in the networkipv4-addr 192.168.255.1
- Test the new setup by starting
taygaonce in foreground:12systemctl stop tayga <– Disable if already startedtayga -d –nodetachThis should give something like this:
1234567starting TAYGA 0.9.2Using tun device nat64 with MTU 1500TAYGA’s IPv4 address: 192.168.255.1TAYGA’s IPv6 address: 2a01:4f8:1:3:135d:6:4b27:5fNAT64 prefix: 64:ff9b::/96Note: traffic between IPv6 hosts and private IPv4 addresses (i.e. to/from 64:ff9b::10.0.0.0/104, 64:ff9b::192.168.0.0/112, etc) will be dropped. Use a translation prefix within your organization’s IPv6 address space instead of 64:ff9b::/96 if you need your IPv6 hosts to communicate with private IPv4 addresses.Dynamic pool: 192.168.255.0/24 - Stop the manually started instance and edit
/etc/default/tayga. SetRUNtoyes:12# Change this to „yes” to enable taygaRUN=„yes” - Launch the service
1systemctl start tayga
systemctl status taygashould say the Active state isactive (running), the log should end with1... systemd[1]: Started LSB: userspace NAT64. - If the Active state is
active (exited)and the protocol says something about „setRUNtoyes”, you have forgotten to enable the RUN option in/etc/default/tayga. If you correct that, you have to perform astopand astartcommand afterwards to launch tayga:12systemctl stop taygasystemctl start tayga
DNS64 with bind
NAT64 is usually used together with a so-called „DNS64” name server. This is a specially configured name server. If a client asks it for an IPv6 name resolution, i.e. an AAAA name service record and there is only an IPv4 A record for the requested name, the DNS64 name server „mocks up” an AAAA record munging the IPv4 address and a „well-known prefix” to a synthetical IPv6 address. This address – surprise, surprise – points directly to a nicely prepared NAT64 server so that the IPv6 system talks to an IPv4 system transparently hidden behind the NAT64 proxy.

DNS64 and NAT64 translate between IP protocols
Go on like this:
- Install bind9 on the host:
1apt install bind9
- Our bind is a forwarding only-server only for our own virtual machines. On Debian-derived systems, the bind options needed for this setup are located in
/etc/bind/named.conf.options. Edit that file and enter the following entries:123456789101112131415161718192021options {directory „/var/cache/bind”;forwarders {2a01:4f8:0:1::add:1010; # Hetzner name servers2a01:4f8:0:1::add:9999;2a01:4f8:0:1::add:9898;};dnssec-validation auto;auth-nxdomain no; # conform to RFC1035listen-on {};listen-on-v6 {<IPv6 network assigned by provider>::/64;};allow-query { localnets; };dns64 64:ff9b::/96 {clients { any; };};}; - The actual important definition is the
dns64section at the bottom of theoptionsdefinitions. It enables the DNS64 mode of bind and defines the IPv6 address range into which the addresses should be converted. - It also important to define
listen-on {};to disable listening on the IPv4 port altogether – we do not need it. Restrictingallow-queryto thelocalnetsis also important to prevent the server from becoming an open DNS relay. We only need it for our internal network. - Check the network in
listen-on-v6and also check theforwarders. You whole IP address resolution will not work if one of these is wrong. - Restart the daemon and check that it is enabled and running:
12systemctl restart bind9systemctl status bind9
After these steps, you have a working DNS64 server which you can use for all your virtual machines on the system.
2001:4860:4860::6464 and 2001:4860:4860::64 offering this service. Their replies are compatible with our NAT64 setup. However, having an own server reduces external dependencies and allows for additional services lateron.Include NAT64/DNS64 into radvd advertisements
We now have the NAT64/DNS64 service pair up and running. We will inform the virtual machines by the router advertisement daemon we have already set up. This simplifies installation and administration tremendously:
- Extend
/etc/radvd.conf:123456789interface br0{[...]RDNSS <IPv6 address of host with DNS64 bind>{};route 64:ff9b::/96 {};}; - The
RDNSSdefinition describes which DNS server to access. Use the host’s IP address. If you opted for the Google servers to do the job, write instead1234RDNSS 2001:4860:4860::64642001:4860:4860::64{}; - The
routesection advertises that this system routes the64:ff9b::network. Only with this definition the virtual servers know where to send the packets for the emulated IPv6 addresses for the IPv4-only servers to. - Restart
radvdand check its output withradvdump. It should contain both the DNS server and the NAT64 route.
radvd. For the DNS servers, however, they use IPv6 example addresses from the 2001:db8 realm. It took me three days and severe doubts about Hetzner’s IPv6 setup to find out, that my only mistake was to copy these wrong IP addresses for the DNS server into the configuration. Don’t make the same mistake…You have now prepared everything for the IPv6-only virtual machines to come: They get their network configuration through the centrally administrated radvd. The advertised setup includes a name server with DNS64 and a NAT64 route to access IPv4-only systems.
Install KVM
We’re now ready for the final steps! Our network is configured far enough so that we really can start installing virtual machines on our system. For this, we, of course, need KVM. For Ubuntu 18.04 I followed the first steps of this guide::
- Check that the system supports virtualization at all. Issue
1egrep -c ‚(vmx|svm)’ /proc/cpuinfo
and verify that the result is greater than 0.
- Then, apply
12apt install cpu-checkerkvm-ok
and check that the result is
12INFO: /dev/kvm existsKVM acceleration can be usedIf not, the BIOS settings of the system must be corrected. Contact the hosting provider to sort that out.
- Install KVM and the required helper packages:
1apt install qemu qemu-kvm libvirt-bin bridge-utils virt-manager
This will install a rather large number of new packages on your host. Finally, it will be capable to server virtual machines.
- The
libvirtddaemon should already be up and running at this point. If this is, for any reason, not the case, start and enable it with the usualsystemctlcommands or whatever the init system of your host server requires to do this. - To simplify installation and administration of your virtual machines, add the „normal” user you created above to the
libvirtuser group. I prefer doing this by simply adding the user name to the definition in/etc/group:1libvirt:x:<groupid>:USERNAME
Well, that’s it! Our system can get its first virtual machine!
The first virtual machine
Installing a virtual machine might sound difficult to you if you have never done this before. In fact, it is not. After all, it is even simpler than the remote installation on a hosted system once you get used to it. On the physical machine, you are dependent on what the hosting provider offers as installation procedures. KVM offers you more or less a complete virtualized graphical console which allows acting just as you were sitting in front of the (virtual) computer’s monitor. This way, you can install whatever you like.
Furthermore, if you make a configuration mistake on the physical host, you might end with a broken machine. If this happens in a virtual machine, you have several ways to solve the problem: You can connect to the console and log in directly without network access. If the machine does not boot anymore, you can even mount the virtual hard disk into the physical machine and try to fix. And if the machine is for any reason broken beyond repair, you can just throw it away and start over with a fresh installation.
I suggest starting with a throw-away virtual machine. It will not contain any „real” services but only show any remaining problems in the setup. Further, it allows to test and learn the whole process of installing a virtual machine in the setup. Prepare the setup with the following steps:
- Copy the installation ISO image for the system to install onto the host.
- Connect to the KVM system using
virt-manager. Of course, you might also use another client, but I find this rather easy. - Use the ssh connection of the normal user created on the host.
- Start the host creation.
From here on, things become rather standard. We’re now in the process of installing a guest system in a KVM guest. My best practices are these:
- Assign as many CPUs to the virtual machine as the hardware has. Only if you suspect the virtual machine to grab too many resources, reduce the CPU number.
- Use cow2 image file for the virtual hard disk. It is the most flexible way once it comes to migrating the virtual machine and today’s file systems can cope with the double indirection quite well.
- Give the virtual machine definition the same name the system will later have.
The one interesting point is the network configuration at the very end of the definition process. Here, enter the „Network selection” before creating the machine. Select „Name of common device” and give the name of bridge explicitly. Here it is br0.
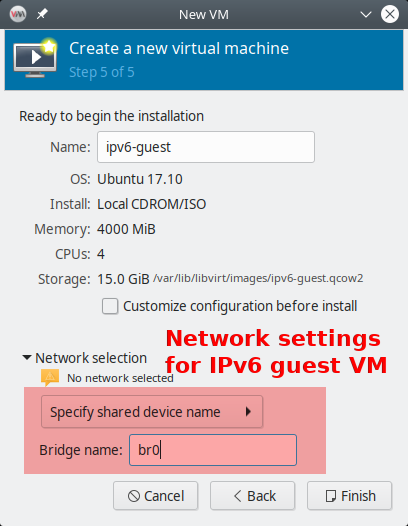
Network setup for virtual machine in virt-manager
If you are ready, press „Create” and summon your first virtual system.
Ubuntu 18.04 as guest system
We’re now at a stage where you can install any operating system which is installable in KVM virtual machines. I give some advises for the Ubuntu 18.04 network installer:
- Install by simply pressing the „Install” button. I never needed any additional kernel parameters.
- Select correct keyboard or it will drive you nuts.
- Network autodetection will idle around when looking for the non-existing DHCP server. Keep calm. Apart from that, it will simply setup everything correctly.
- Enter the hostname, preferrably the same as the name of the virtual machine to keep it simple…
- Check whether you provider has their own mirror for the installation server. Hetzner has, therefore you can save download time:
- Go to top of mirror list and press
enter information manually - For Hetzner:
mirror.hetzner.de. This server also works also with IPv6. But even IPv4 servers would be possible due to our NAT64/DNS64 setup. - Set directory for the Hetzner server to
/ubuntu/packages/
- Go to top of mirror list and press
- You do not need a HTTP proxy.
- Install should start.
- I suggest to not partition the virtual hard disk in any way. It is not needed.
- Everything else is as usual. In the software selection, you should at least select the „OpenSSH server” so that you can log into the system after installation.
Ubuntu 18.04 within KVM virt-manager
As this is Ubuntu 18.04, this machine uses netplan for network configuration. It has a very simple definition file in /etc/netplan/01-netcfg.yaml:
|
1 2 3 4 5 6 7 8 |
# This file describes the network interfaces available on your system # For more information, see netplan(5). network: version: 2 renderer: networkd ethernets: ens3: dhcp6: yes |
Netplan summarizes router advertisement in the „dhcp6” statement.
Note that after (re-)booting the virtual machine, it may take some seconds until it has configured its network interface. Once it has done so, everything should work without problems.
Entering the virtual machine in DNS
To work with the long IPv6 addresses conveniently, DNS is almost mandatory. You should enter the virtual machine now into the domain.
- Find the virtual machine’s IP address, e.g. through „ip a”.
- Create an entry in the DNS zone of the system. Note that you only enter a
AAAArecord, not an old-fashionedArecord for an IPv4 address. The system just has no IPv4 address… - In my opinion, it makes also sense to always create a reverse IP entry for IPv6 hosts. If for any reason your DNS AAAA entry vanishes, you still have the reverse IP entry which assigns name and IP address. Reverse IP entries are always managed in the DNS realm of the IP network owner. In my case, they are edited in Hetzner’s robot interface.
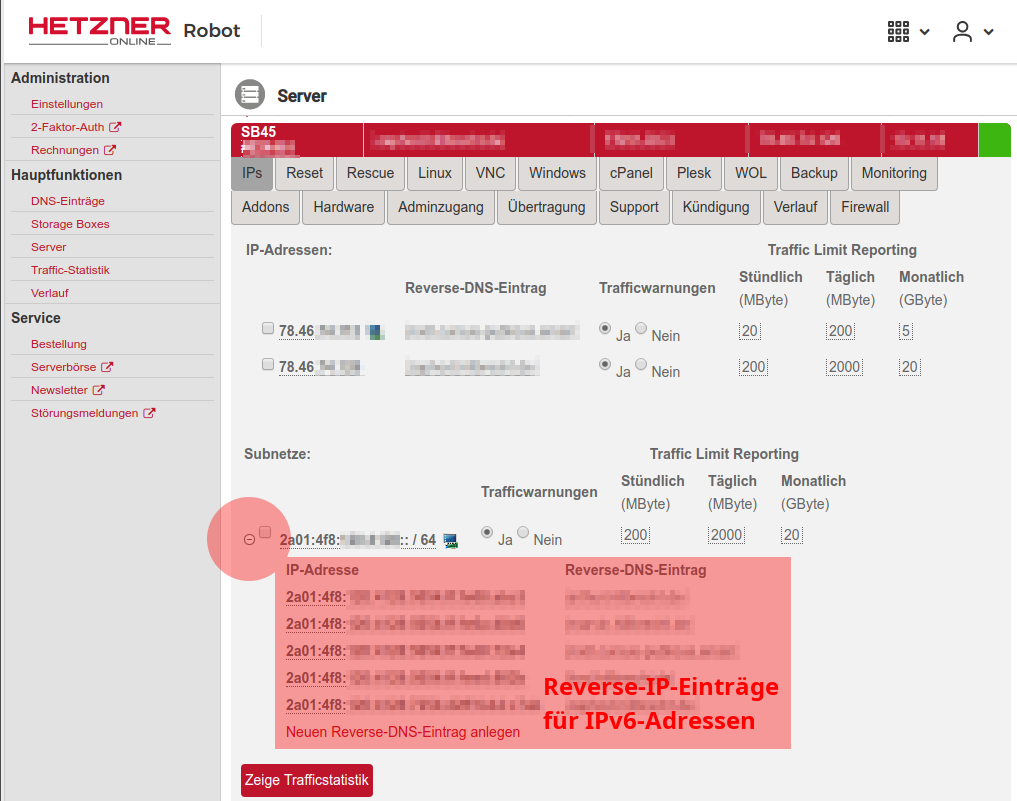
Reverse IP entries in Hetzner’s robot interface
The SLAAC mechanism derives the IP address from the MAC address of the virtual machine. So, it will be static even though it has nowhere been configured explicitly. This whole mechanism works smoothly with any modern operating system. I even made a test installation of Windows 10 which went perfectly without any IPv4 address.
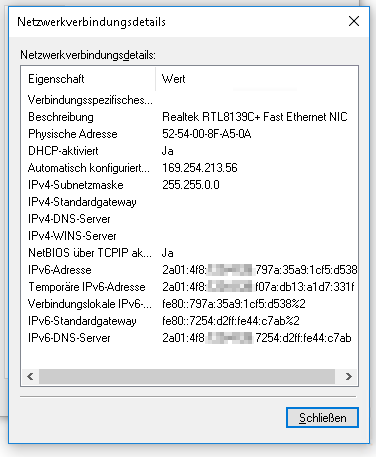
IPv6-only network settings in Windows 10
We can now install any number of virtual machines on our server. In the next articles of this series, I describe how I set up some services on this infrastructure. The most important ones are, of course, e‑mail and web servers.
Hey Dirk.
I have a problem with Hetzner DNS:
Jul 14 13:10:52 nimblevm‑1 named[26207]: timed out resolving ‚./DNSKEY/IN’: 2a01:4f8:0:1::add:9898#53
Jul 14 13:10:53 nimblevm‑1 named[26207]: timed out resolving ‚./DNSKEY/IN’: 2a01:4f8:0:1::add:1010#53
Jul 14 13:10:54 nimblevm‑1 named[26207]: timed out resolving ‚./DNSKEY/IN’: 2a01:4f8:0:1::add:9999#53
Jul 14 13:11:01 nimblevm‑1 named[26207]: resolver priming query complete
Jul 14 13:11:01 nimblevm‑1 named[26207]: managed-keys-zone: Unable to fetch DNSKEY set ‚.’: timed out.
In radvd.conf:
interface br0
{
AdvSendAdvert on;
AdvManagedFlag off;
AdvOtherConfigFlag off;
AdvDefaultPreference high;
prefix 2a01:x:x:x::/64
{
AdvOnLink on;
AdvAutonomous on;
AdvRouterAddr on;
};
RDNSS 2001:db8:0:a0a1::add:1010
2001:db8:0:a102::add:9999
2001:db8:0:a111::add:9898
{
};
route 64:ff9b::/96 {

};
};
in bind9:
options {
directory „/var/cache/bind”;
forwarders {
2a01:4f8:0:1::add:1010; # Hetzner name servers
2a01:4f8:0:1::add:9999;
2a01:4f8:0:1::add:9898;
};
dnssec-validation auto;
auth-nxdomain no; # conform to RFC1035
listen-on {};
listen-on-v6 {
2a01:xx:xx:xx::/64;
};
allow-query { localnets; };
dns64 64:ff9b::/96 {
clients { any; };
};
};
Did you have any idea? (I used Ubuntu 20.04)
I can also ping:
test@test:~$ ping github.com
ping: connect: Network is unreachable
test@test:~$ ping google.com
PING google.com(arn09s11-in-x0e.1e100.net (2a00:1450:400f:807::200e)) 56 data bytes
64 bytes from arn09s11-in-x0e.1e100.net (2a00:1450:400f:807::200e): icmp_seq=1 ttl=119 time=7.57 ms
64 bytes from arn09s11-in-x0e.1e100.net (2a00:1450:400f:807::200e): icmp_seq=2 ttl=119 time=7.62 ms
Hello Mihai,
you have an error in your radvd configuration. The RDNSS entry must point to YOUR OWN physical host, NOT to the Hetzner DNS servers. So, if the IPv6 address of your host is 2a01:1:2:3:a:b:c:d, the RDNSS section must read
RDNSS 2a01:1:2:3:a:b:c:d{
};
This way, you announce your own Bind DNS server to your virtual machines – and that is needed for the DNS64 mechanism. Currently, your radvd announces the Hetzner DNS servers to your virtual machines. When they query it for „github.com”, it only returns an IPv4 address. The virtual machine, however, has no IPv4 connection and therefore cannot access the system. For google.com, an IPv6 address is returned – and as the virtual machine has IPv6 connectivity, it can connect to it. When everything is configured correctly, your virtual machine connects to „github.com” using an IPv6 address beginning with „64:ff9b” and ending with the hexadecimal representation of the IPv4 address of github.com. It’s the one returned by your Bind server. The connection succeeds because of the radvd server on the host which performs an address translation beween the IPv6 network you use internally and the external IPv4 address. github.com sees a IPv4 connection from your host.
Best regards,
Dirk
Hey Dirk,
Thanks a lot for your answer. I fixed the radvd configurations and now when I’m trying to ping github.com from my guest:
test@test:~$ ping6 github.com
PING github.com(lb-140 – 82-118 – 3‑ams.github.com (64:ff9b::8c52:7603)) 56 data bytes
^C
— github.com ping statistics —
5 packets transmitted, 0 received, 100% packet loss, time 4088ms
Did you have any idea?
Is bind9 needed if I use Hetzner DNS? If no: What should my config rdvd look like, and also tayga.
Thanks a lot!
Pinging to an IPv6-connected system, e.g. google.com, still works, right? It looks like NAT64 does not work: The virtual server gets a DNS64-prepared IPv6 address for the IPv4-only server but cannot connect it.
The default route of the virtual server must point to the host system. In my setup, routing looks like this:
root@virthost:~# ip -6 route show64:ff9b::/96 via fe80::4e75:c4ff:fe88:1d14 dev ens3 proto ra metric 1024 pref medium
2a01:123:456:7890::/64 dev ens3 proto ra metric 100 pref medium
fe80::/64 dev ens3 proto kernel metric 256 pref medium
default via fe80::4e75:c4ff:fe88:1d14 dev ens3 proto ra metric 100 pref high
First line is the NAT64 route, second and third define the networks directly reachable on the interface, last line is the default route. First and last line opoint to the host system. It must look similar on your virtual machine. If it does not, check radvd again. „prefix” line contains your network? Can you ping the host system from the virtual machine on its IP addresses? Did you have added the MAC address rewriting using ebtools as described in the first article? These are the things that come to my mind. Let me know the results.
Hey,
Pinging to google still works. Also from my guest I can pinging my ipv6 from host.
ip ‑6 route show
64:ff9b::/96 via fe80::d65d:64ff:feba:e420 dev enp1s0 proto ra metric 1024 expires 1771sec pref medium
2a01:123:456:7890::/64 dev enp1s0 proto ra metric 100 expires 86371sec pref medium
fe80::/64 dev enp1s0 proto kernel metric 256 pref medium
default via fe80::d65d:64ff:feba:e420 dev enp1s0 proto ra metric 100 expires 1771sec pref high.
Prefix line contains my network. I added the MAC address rewriting using ebtools.
But I really don’t understand this part:
”
After having changed the IP address this way, enter it into DNS:
Add an AAAA record in the domain the system should be reachable in.
Add a PTR record in the hoster’s reversal IP entries. If there is already an entry for the former address, you can remove it by simply wiping out the server name and pressing „Enter”.
While you’re at it, also add the A record and the PTR record for the IPv4 address of the Host.
”
You use a registrar like Hetzner DNS ? (I don’t create any domains). Please help me with that (maybe that’s the problem)
Thanks a lot!
Hey Dirk,
„Entering the virtual machine in DNS
To work with the long IPv6 addresses conveniently, DNS is almost mandatory. You should enter the virtual machine now into the domain.
Find the virtual machine’s IP address, e.g. through „ip a”.
Create an entry in the DNS zone of the system. Note that you only enter a AAAA record, not an old-fashioned A record for an IPv4 address. The system just has no IPv4 address…
In my opinion, it makes also sense to always create a reverse IP entry for IPv6 hosts. If for any reason your DNS AAAA entry vanishes, you still have the reverse IP entry which assigns name and IP address. Reverse IP entries are always managed in the DNS realm of the IP network owner. In my case, they are edited in Hetzner’s robot interface.”
And also if you can explain me that I really appreciate it!
Thanks a lot!
Hello Mihai, this part decscribes how you enter the host and the virtual machines into the DNS name server for your domain. It stores key-value-pairs of information in so-called „records”. The records have different „types”. An „A”-record’s key is a computer name („x.eample.com”) and the value is an IPv4 address („1.2.3.4”), so it allows to retrieve the IPv4 address for a hostname. An „AAAA” record does the same thing for an IPv6 address. So, for a server which should be accessible by both protocols IPv4 and IPv6, (at least) two records must be put into DNS, one „A” and one „AAAA” record. Reverse IP records contain exactly the opposite information, they allow to retrieve a system name for a given IPv4 or IPv6 address. This all is only important for you if you want to access your host and your virtual machines from „the internet”. And, of course, you need a domain and a registrar which allows you to edit the DNS records for the domain. The domain can be hosted at the same provider as your server, but it can also be a totally independent. Best regards, Dirk
Hello,
I have an issue with radvd.conf on Ubuntu 20,
when I add the
routeclause as suggestedroute 64:ff9b::/96 {
};
and then reboot, I cannot SSH to server back and even ping. It happens with either variant of RDNSS clause.
What do you think can be an issue? I tried to reinstall the server from rescue like 5 times and carefully execute instructions and then do reboot after instruction to determine the point when exactly the server won’t be accessible.
Hi Stepan, thanks for your comment. There are always small and not-so-small changes between different Ubuntu versions. I have developed the instructions on Ubuntu 16.04 and 18.04. I had no chance so far to get hands on a Ubuntu 20.04 system to test and check that myself. My guess is, however, that there have been changes in the Netplan configuration which break IPv6 connectivity. Did the reboot after the initial setup of radvd succeed? Did the system have both IPv6 addresses after the reboot as described there? Did you change the address statically assigned to the physical machine from the Netplan configuration? Could you connect to the physical machine via that IPv6 address? Note that all this is only guessing. Good luck & regards, Dirk
Hi Dirk,
yes, all went good right before the step of changing radvd.conf in the 2nd article. So I had two IPv6 on the
br0interface, and then I’ve changed Netplan config, set static one instead of the default::2. I’ve tried to connect to the server via IPv6, all works fine. Just the issue happens exactly after I add therouteclause intoradvd.conf. So now I haveradvd.conflike this (just my IPv6 network prefix hidden):interface br0
{
AdvSendAdvert on;
AdvManagedFlag off;
AdvOtherConfigFlag off;
AdvDefaultPreference high;
prefix 2a01:xxxx:xxxx:xxxx::/64
{
AdvOnLink on;
AdvAutonomous on;
AdvRouterAddr on;
};
# Google DNS
#RDNSS 2001:4860:4860::6464
#2001:4860:4860::64
#{
#};
# Hetzner DNS
RDNSS 2a01:4f8:0:1::add:9999
2001:db8:0:a102::add:9999
2001:db8:0:a111::add:9898
{
};
# Local DNS (bind9)
#RDNSS 2a01:xxxx:xxxx:xxxx:xxxx:5dff:fe0d:dae6
#{
#};
#route 64:ff9b::/96
#{
#};
};
Hello Stepan,
[Note: The reasoning here is false, there is no problem. See below.]
I must admit that I have no real idea what is going on but there seem to be changes in how Netplan and the two IP protocols work. I found this article on Askubuntu. The answer says (well… guesses) that Netplan needs an explicit route for IPv6 to work. My configuration examples do not have such a route for IPv6. Perhaps this is the problem. But again – this is only guessed until I could myself work on an Ubuntu 20.04 system.
Best regards,
Dirk
I was finally able to run the whole procedure with Ubuntu 20.04. It worked without problems. So, the reason why it did not work for you, Stepan, must be somewhere else. I still think that something with the IPv6 setup or routing went wrong in the first place.
The only real difference I found between Ubuntu 18.04 and 20.04 so far is the package list for the KVM system. For Ubuntu 20.04, I use this one:
apt install qemu-kvm libvirt-daemon bridge-utils virtinst libvirt-daemon-system virt-top libguestfs-tools libosinfo-bin qemu-system virt-manager
Apart from that, everything went *exactly* as with Ubuntu 18.04.
Hallo Dirk,
vielen Dank für diese sehr ausführliche und unglaublich hilfreiche Anleitung.
Ich hatte es schon fast aufgegeben so ein setup bei Hetzner möglich zu machen aber deine Anleitung hat gerade alle Steine aus dem Weg geräumt. DANKE!
Sonnige Grüße
Sebastian
Hallo Sebastian,
das freut mich! Ich weiß nicht, wann du der Anleitung gefolgt bist: Ich habe erst kürzlich im ersten Teil den Abschnitt mit der Maskierung der internen MAC-Adressen hinzugefügt. Ohne das macht Hetzner irgendwann Stress…
Viele Grüße und viel Erfolg beim weiteren Administrieren,
Dirk
Hallo Dirk,
danke für den Tipp, ich habe es mit umgesetzt. Nun muss ich nur noch einen sinnvollen Weg finden Serverdienste in den Gästen per IP4 anzubinden. Hast du da einen Tipp? Ich schwanke zwischen Nginx reverse proxy und socat.
Dir eine sonnige Zeit und beste Grüße
Sebastian
Hallo Sebastian,
ich habe das mit einem Reverse Proxy mit Apache gemacht. socat hat bei mir nicht zuverlässig funktioniert und so habe ich nur eine Technik zu warten. Außerdem wirkte socat auf mich arg gebastelt…
Ciao, Dirk